Service லேபிளுடன் இடுகைகளைக் காண்பிக்கிறது. அனைத்து இடுகைகளையும் காண்பி

புதன், 23 செப்டம்பர், 2015

How do I install or uninstall mspaint?

How do I install or uninstall mspaint?

All versions of the Windows operating system include a simple and user-friendly graphics or painting utility called Microsoft Paint. Using MS paint one can draw, edit or import pictures. Like other image editing programs, MS Paint too has color palettes and multi-functional tool bar. You can find MS Paint under the Windows Start menu, within the “Accessories” folder. MS Paint’s easy to use tool bars and features let users create images or edit pictures the way they want to, though with limited options. It saves files in standard formats such as “.jpg” and “.bmp”. More complicated image editing programs like Photoshop or Paint Shop Pro, use the same basic principles as that of Paint. So Paint also serves as a learning platform for users who wish to use more advanced editing programs in the future. If you would like to remove MS Paint from your computer, you could do it easily by following the below mentioned instructions. The following Microsoft Help guidelines will let you remove MS Paint from your computer.
Instructions
  • Open “My Computer” by double-clicking the icon on your computer desktop. Alternatively you may open “My Computer” from the Windows Start menu.
  • Browse to the folder “System32” under the “Windows” folder in the “C:\” drive. You may directly go to the System 32 folder by typing the folder location “C:\Windows\System32” into the navigation bar at the top of your windows screen.
  • Usually the contents of this folder will be hidden to protect it from accidental deletion, or the modification of system files. If it asks you whether you want to view the contents of the folder, click “Yes” to access the hidden files.
  • Now locate the executable file named “mspaint.exe” and right-click to open the popup menu. Select the option “Delete” to delete it from your computer.
    Microsoft Paint
    Help and support for Microsoft products
  • You may also want to delete the associated files with MS Paint application like the MS Paint help files.
  • To do that, browse to “C:\Windows\Help” folder. You will land on Windows Help folder. This folder contains the Help files required by different applications. Now locate the help files for MS Paint. You will find two help files related to Paint. Delete these two files like you did before.
Now Microsoft Paint is completely removed from your computer. Make sure you don’t delete any other system files from the System32 folder or Windows Help folder as it will have adverse effects on your computer. Advanced help is available at Microsoft Help and Support Center.


How do I install or uninstall mspaint? in windows 7

How do I install or uninstall mspaint?

Below are steps on how you can install or uninstall Microsoft Paint (mspaint).
  1. Open the Control Panel.
  2. Double-click Add Remove Programs.
  3. Click the Windows Setup Tab
  4. Double-click the Accessories icon and check or uncheck paint depending upon if you want to install or uninstall mspaint.
When prompted for a diskette, insert your Windows CD or try pointing to "C:\windows\options\cabs" (depending on how Windows was installed on your computer this directory may not exist). If this directory does not exist on your hard drive you need your CD.
Paint
Notice: Computer Hope cannot and will not supply any user with mspaint via download or e-mail. If you have a legal copy of Windows and have lost your CD, it is recommended you contact the manufacturer of your computer or Microsoft for a new CD. There are also dozens of free paint and other image editors available for download.

Uninstall and reinstall MS Paint in Windows XP

Uninstall and reinstall MS Paint in Windows XP

You require the Windows XP CD-ROM to reinstall the Windows components such as Paint
  • Click Start, Run and type control appwiz.cpl,,2
    (or, use Add/Remove Programs applet, Add/Remove Windows Components)
  • Double-click Accessories and Utilities
  • Double-click Accessories
  • Uncheck Paint and click OK, OK.
  • Click Next.
Windows will now uninstall Paint brush. Now, insert your Windows XP CD in the drive and repeat the above procedure, but enable the Paint entry in the 4th step and click Next. The required files are extracted from Windows XP CD-ROM and Paint is now reinstalled.

திங்கள், 20 ஜூலை, 2015

How to create a bootable Windows 7 USB flash drive

How to create a bootable Windows 7 USB flash drive :  For those who don’t have a windows 7 installation disk or either it is damaged, then you can create and use a Bootable USB flash drive to install Windows 7 on your PC. The process of creating a Bootable windows 7 USB flash drive is fairly easy, however you will have to download a copy of windows 7 ISO file.
Fortunately Microsoft provides Windows 7 ISO images as free downloads to the public.  You can download Windows 7 iso images from here and Once you have downloaded a Windows 7 ISo file, you can then follow the instructions provided below to create a Bootable windows 7 USB flash drive.

Instructions to create a Bootable Windows 7 USB Flash Drive 

bootable usb flash drive.
  • Step 1: Download rufus on your computer and run it .
  • Step 2: Plug in your USB flash drive into your computer .
  • Step 3: From Rufu’s settings, Choose NTFS as the file system.
  • Step 4: Check ” Quick format ” and ” Create extended label and icon files “
  • Step 5: Check ” Create a bootable disk using ” and click the drive icon beside it to select the windows 7 ISO file .
  • Step 6: Now click on start to create a bootable window 7 USB flash drive .
After a few minutes your Windows 7 bootable  USB flash drive will be  ready for installation. Reboot your PC and set the bootable flash drive as a first boot priority in the bios settings. Save the bios settings and reboot once again to continue with the windows 7 installation process .
 Note: You have to allow booting from USB devices in your BIOS settings in order to proceed further with the windows 7 installation .

Install Windows 7 from a USB drive the very easy way

Install Windows 7 from a USB drive the very easy way

The fastest way to install windows 7 is from a bootable usb drive. You can cut the install time down to around 15 minutes compared with 30-40 via DVD if you use a fast drive.
People still asking me to explain what is the best way to do this as many of the guides online are too complex, or require third party software which doesn’t always work as they supposed to.
With this BootableUSB guide all you need to ensure is that your motherboard supports USB booting, and this is a common feature now for most of the computers.
Today I am going to publish a step by step guide which works perfectly and doesn’t require any additional tools – I have been doing it for some time now to create bootable Windows install drives.
You need to get hold of a fast USB 2.0 flash drive. It doesn’t need to be 32GB or bigger,however, all you need is a 4GB unit. The faster it is, the better.
What you need:
– Windows 7 DVD install disc or ISO image
– USB Drive (4GB+ and as fast as you can get)
– Running Windows Operating system
– Working set of hands and eyes
– A few minutes of your life
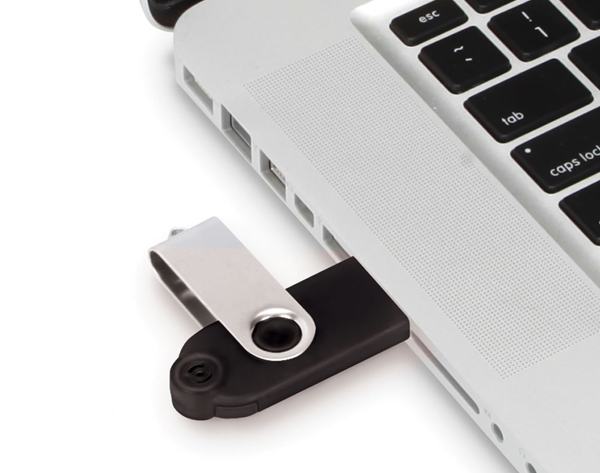
Plug in your USB drive in the USB port:
Usb Drive Plugged
Before going any further, make sure you have removed any important files on your drive to a safe location, what we are about to do next is to erase the entire contents of the drive.
Insert your DVD of Windows 7 into the computer, but don’t start the normal install process.
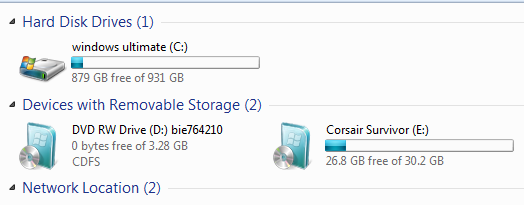
Open your ‘My Computer’ and make a note of the drive numbers of both the USB drive and the DVD drive with Windows 7 files on it.
Usb And Computer Drives

As you can see from the image above, the DVD drive is drive has letter D assigned and the USB drive is E.
Open the command prompt with admin rights. Type cmd in Start menu search box and hit Shift+Ctrl+Enter.
To keep things really easy, if you see text in upper case, it means this is what you type into the command prompt (you don’t need to type in upper case).
cmd-prompt-usb-bootable

Next type
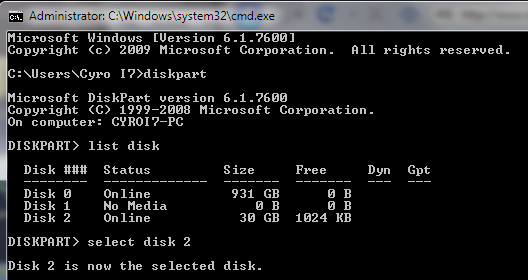
DISKPART
this loads the diskpart application we need to proceed
Then type
LIST DISK
the image above shows our 32 GB USB drive is listed as DISK 2
so you have to type
SELECT DISK 2 (your USB Drive may have a different number, don’t follow exactly this text it depends on your usb drive)

You will get a successful response “Disk 2 is now the selected disk”
Clean Cmd USB Drive
Next we want to clean the USB drive
Type:
CLEAN
you will get a successful response ‘DiskPart succeeded in cleaning the disk”.
Clean USB Drive

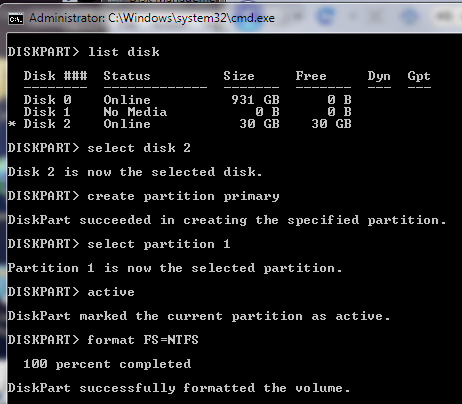
After the drive is cleaned follow the list in the image above (detailed below in list order) – you can also note the successful text responses from the OS as you enter each command.
SELECT DISK 2 (or what number your USB drive has)
CREATE PARTITION PRIMARY
SELECT PARTITION 1
ACTIVE
FORMAT FS=NTFS
Formatting can take a little time depending on the size of the drive, our 32GB unit took about 10 minutes to format - you will see a percentage readout until it is finished.
Bootable USB Final Cmd Prompt
Next type:
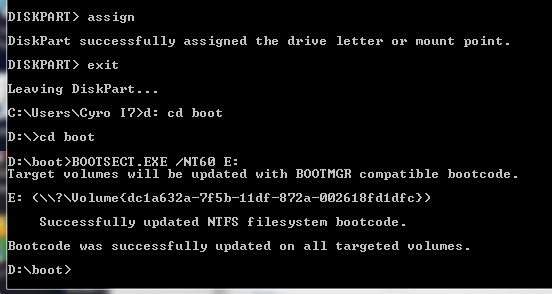
ASSIGN
EXIT (DISK PART will exit)

Type D: CD BOOT (substitute the “D” if necessary with the letter of your Windows 7 DVD drive)
then key
CD BOOT
then
BOOTSECT.EXE /NT60 E: (substitute the “E” if necessary with the letter of your now ready USB drive) – we are telling the system to create a boot sector file on the USB drive.
Now you can exit the command prompt and copy all the files on the Windows 7 DVD to the USB drive.
Once this step is finished you’ll be ready to boot from this drive, all you need to do is configure your motherboard bios setup to boot first from USB rather than hard drive or optical drive. If you don’t know how to do this, refer to your specific motherboard manual or search the internet.
Now, Windows 7 installation should take between 40% and 60% of the time it does from the DVD disc.
Last step: Drink a cup of tea, from now on you can do this again and again :)

வியாழன், 23 ஏப்ரல், 2015

How to connect Android Mobile Phone to PC for internet

How to connect Android Mobile Phone to PC for internet

For Connect Android phone to PC OR Laptop, Perform 2 steps to follow.
1. Mobile Settings
2. Desktop computer OR laptop Settings

1. Mobile Settings

Before Start Configuration, Note that "Data" Option should be Enable in Android Phone. To Enable "Data", Go to settings -> Wireless & Networks -> Mobile Networks –> Data Enable, Check this box (Check Data Roaming in case of Roaming).
For Dual Sim Mobile Phones Select Sim1 OR Sim2 for Data Connection.

There are 2 Methods for connect Android Phones to PC OR Laptop for internet.

1.1 USB tethering
1.2 Portable Wi-Fi Hotspot

1.1 USB tethering
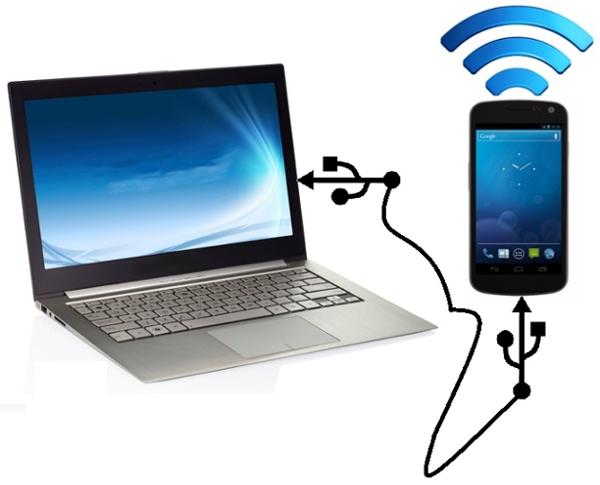
Plug in USB Cable from Your Desktop Computer/Laptop to Android Phone.
In Android phone go to settings -> Wireless & Networks ->Tethering & portable hotspot and tap it.
Now Check "USB Tethering".

Now You will be able to use the data connection from the phone on your PC/Laptop.

1.2 Portable Wi-Fi Hotspot
Configure Wi-Fi Hotspot in Android Phone. For That go to settings -> Wireless & Networks ->Tethering & portable hotspot -> Portable Wi-Fi hotspot settings -> Configure Wi-Fi hotspot.
Network SSID – priceandspecification
Security – WPA2 PSK
Password – 87654321 or you can set any 8 digit number.
Save it.

In Android phone go to settings -> Wireless & Networks ->Tethering & portable hotspot and tap it.
Check "Portable Wi-Fi hotspot"

Now You will be able to use the data connection from the phone on your (Wi-Fi enabled Devices) PC/Laptop.

2. Desktop computer OR laptop Settings.
2.1 how to connect Android Phone to PC for internet – Windows XP
2.2 how to connect Android Phone to PC for internet – Windows 7

2.1 how to connect Android Phone to PC for internet – Windows XP
Follow the steps 1.1 For connect Android Phone to PC for internet Via USB.
Follow the steps 1.2 For connect Android Phone to PC for internet Via Portable Wi-Fi Hotspot.

Click Here to Download Android Mobile Modem Driver / USB Tethering Drivers / RNDIS driver download for Windows XP.
It will Give you an error message “You can also try to download the original document by clicking here”. OR “The file exceeds the maximum size that we scan. Download anyway” You have to Click that link to download Zip File.

Password for connect_android.zip File : priceandspecification.in


connect_android.zip contains 4 Files.

File 1. Install Hot Fix Windows Xp(WindowsXP-KB959765-x86-ENU).
File 2. In case of Path not found for R NDIS in Windows Xp, Browse this folder for Modem driver installation.
File 3. Tethering file for windows Xp. Right Click on it and click on Install.
File 4. Select O.S. 32 bit or 64 bit, Browse path and install drivers

2.2 how to connect Android Phone to PC for internet – Windows 7
Follow the steps 1.1 For connect Android Phone to PC for internet Via USB.
Follow the steps 1.2 For connect Android Phone to PC for internet Via Portable Wi-Fi Hotspot.

In Windows 7 R NDIS driver are automatically installed on connect android mobile to PC via USB, In case of Driver not Installed Properly, Download connect_android.zip. And Use File 4.

How to factory reset a smartphone (Android, iPhone and Windows Phone tutorial)

How to factory reset a smartphone (Android, iPhone and Windows Phone tutorial)

Posted: , by Victor H.
How to factory reset a smartphone (Android, iPhone and Windows Phone tutorial)
Sometimes you just need to get rid of all your personal data before you sell a device.

The easiest way to do this is something called factory reset - an option that allows you to bring your smartphone to the state it was in right out of the factory floor. No personal photos, no sensitive documents, nothing that you may otherwise forget to delete will get in the hands of other people.

So how do you do it?

Disclaimer: Once you do a factory reset, ALL of your personal data - including photos and all other documents - will be deleted off your phone and there will be no way to get it back. MAKE SURE YOU HAVE BACKED UP ALL YOUR IMPORTANT DATA FIRST.

On Android


If your phone is fully functional (you haven’t messed up something while playing with custom ROMs, for instance), all it takes is:

Factory reset via fastboot
1. Go into Settings -> ‘Backup & Reset’
2. Select ‘Factory data reset’
3. Then tap on ‘Reset phone’
4. Finally, touch ‘Erase everything’ and wait a few minutes until it’s all done. That’s it!

This is the exact steps you should follow on just about any Android smartphone or tablet - you can factory reset the Samsung Galaxy S5 this way, Note 3, the HTC One (M8), the LG G3, Sony Xperia Z2, Moto X, Moto G, and many others.

In case your smartphone is not starting up properly, you’d need some other tactics. Do the following:

1. Power your gadget off.
2. Hold down the Volume Down key and the Power/Lock key simultaneously for a few seconds. (This way you ‘fastboot’ your Android device)
3. After letting go, you’d see a menu with several options. Navigate using ONLY the volume down key. Go to ‘Factory’ and select it by pressing the volume up key. Your phone will do the rest of the magic, and will restore itself to factory settings in just a few minutes.

On iPhone


1. Go into ‘Settings’ and select the ‘General’ tab
2. Next, you’ll see many options, but what we’re looking for here is to ‘Erase All Content and Settings’
3. Tap on it and confirm your intentions to wipe all iPhone data clean.
4. Your iPhone will start doing its magic and in a few minutes it will reboot completely clean and fresh, as if it was just out of the factory floor.

Note that this tutorial will work with the latest versions of iOS with phones like the iPhone 5s, iPhone 5c, iPhone 5, iPhone 4s, etc.

How to factory reset a smartphone (Android, iPhone and Windows Phone tutorial)

On Windows Phone


1. Go into ‘Settings’ and scroll down to the ‘About’ tab. Select it.
2. There, you’d see a ‘reset your phone’ button.
3. Just tap on it, and confirm that you indeed want to delete all of your data.
4. A short wait of just a few minutes, and you’d have a factory reset phone. That’s it!

Note that this tutorial will work with the latest versions of Windows Phone with phones like the Nokia Lumia 1020, Lumia 520, etc.

Samsung Hard reset

What does a Samsung Hard reset really means?

[Answer] What does a hard reset really means? it means to reset your phone to the settings and features
which were accompanied from the company or at firmware update instant.

=============================================

There are actually two codes you can use to reset the password and phone setting.
Below are these codes. Type them in the phone and this should solve your problem.

*2767*3855#

and

*2767*2878#

The security code will be reset to 0000.
This will allow you to format the phone easily.

================================================

Here some tutotial how unlock phone, this work on many models:
Follow those steps:

1.)*2767*3855#
2.)*7465625*638*00000000*00000000#
3.)#7465625*638*00000000#

Now your phone is unlock forever Permanent

Perform a Factory Data Reset (Device Powered On) - Samsung Fascinate

Perform a Factory Data Reset (Device Powered On) - Samsung Fascinate

[Device-Specific Instructions]
A factory data (hard) reset may help with a blank or frozen screen, apps crashing or freezing, keypad/touchscreen problems, can't hear, device making noises, can't make or receive calls and device won't sync. Our Troubleshooting Assistant can help you with other device issues if you aren't currently using the tool.
Warning Perform a factory data reset only if absolutely necessary as it removes all data including:
  • Google account
  • System and app data
  • App settings
  • Downloaded apps
  • Music, pictures and videos (It's recommended to backup this data).

Note Notes:

  1. From a Home screen, tap Apps Applications icon (located in the lower-right).
  2. Tap Settings.
  3. Tap Privacy.
  4. Tap Factory data reset.
  5. Tap Reset phone.
    Note If presented, enter the current passcode or draw the unlock pattern.
  6. Tap Erase everything.
    Note Allow up to 10 minutes for the factory data reset and reboot processes to complete.
    Note To setup the device after the reset has completed, refer to Initial Activation and Setup.

Reset an Android Phone

How to Hard Reset an Android Phone

Is your Android Smartphone slow, freezing, not responsive, responding incorrectly, or you can’t remember the phones password? You’re in luck! There is still a pretty powerful option available, and that is to perform a hard reset, also known as an alternate reset, on the device.
Before we begin… If you are still able to access the setting on your device and navigate the phone then you might be more interested in reading How to backup and reset an Android phone, which goes through the process of doing a full backup and then performing a Factory Data Reset through the phones settings.
If you’re having problems accessing your factory data reset options through the settings then you can still perform a factory reset on your Android Smartphone and this article will show you how to do it. This is the perfect solution if you’re having problems with your touch screen, or you can’t navigate correctly on your phone. It’s also an option if you can’t get your device to power on all the way or when your phone won’t power on at all.
If you’re seeking to do a reset on your Android Smartphone then you most likely know how effective a reset can be at solving issues on phones. Through this article I am going to go over multiple ways to perform resets on your phone without actually having to navigate through the touch screen. Your phone doesn’t even need to be on in order to do it in most instances!

Make sure the device is powered off

Most of these hard resets require that your phone is completely powered off, so make sure that your phone is powered off all the way not just locked. If you’re phone isn’t responding and you can’t power off the phone with the power button, then you might need to pull the battery out, count to ten, and then put the battery back in. Just don’t power the phone back on if you have to reinsert the battery. Keep the device powered off.
Also make sure that your phone is not plugged into a charger. If the phone is plugged into a charger or if the device is not fully powered off, the reset is not going to work.

Hard reset methods and procedures may differ

Alternate resets also usually involve performing a series of key combinations which we’ll get to in a minute. The key combination you have to perform will highly depend on the specific make and model of the phone and what version of Android OS (Operating System) is currently running on the device. For example you might be able to perform a reset on a phone one way if it’s running the 2.2 (Froyo) OS, then you upgrade your phone to the 2.3 (Gingerbread) OS and the method no longer works, causing you to use a different method (I have an example of this in method 6 and 7 below). When you upgrade again to the 4.0 (Ice Cream Sandwich) OS you might have to use a different method and different key combination to perform the same alternate reset. So just beware of this.
You might also need to attempt the reset a couple times for it to go through correctly.
Disclaimer: Remember that a reset is permanent and cannot be undone. It will erase all personal data and downloaded content on the phone, don’t worry it will not affect or erase your memory card or anything saved on your SIM card. This includes content such as pictures, ringtones, texts, apps, etc. and will usually fix software glitches, bugs, viruses, etc as well. Try if at all possible, to perform a backup first. Usually when you need to perform an alternate reset on your mobile phone you might not be able to do a backup.

Preparation for a hard reset on an Android phone

Just a minor side note, on a typical alternate reset so that you know what to expect. You’re going to power the phone off, hold a specific set of key combinations (shown below), access a fastboot/testing/recovery/etc screen, select reset, and then the phone is going to power itself off, all by itself, then it’s going to power itself back on, all by itself. This can take a few minutes, some phones can take up to 15 min to reboot (pretty uncommon though, the average phone probably takes 3-5 min). Once it reboots the phone is going to think its brand new right off the shelf. So go ahead and set it up again like you did when you first got it.
If you own an Android Smartphone manufactured by Pantech then unfortunately you cannot perform an alternative reset on your device. Pantech Smartphones currently do not have a hard reset feature; the only reset available on Pantech phones is through the settings.

Let’s start with the most common Hard Reset methods and go from there:

Note: the different types of methods are numbered, method 1, method 2, method 3, etc.
1. When the phone is powered off, press and hold the Volume Up and the Volume Down keys both at the same time, then press and hold the Power key until a test screen that shows some available options appears, usually takes about 15-20 seconds. When that screen pops up you can let go of the keys.
Press the Volume Down key to navigate down through the options until it highlights FACTORY RESET then press the Power key to select it.
2. Power the phone off all the way, press and hold the Volume Down key and press than release the Power key, still holding the volume down key for about 10-15 seconds. When you see some additional options pop up on the screen you can let go of the keys.
Press the Volume Down key to navigate down through the options until it highlights the reset option; it usually says FACTORY RESET, then press the Power key to make the selection.
3. While powered off, press and hold the Home key, while continuing to hold the home key power the device on by pressing the Power key.
Once the Android Recovery screen appears release the Home key, then while on the Android Recovery screen, press the Volume Up and Volume Down keys both at the same time.
If/when you’re on the Android System Recovery screen release all the keys, and then use the Volume down key to navigate down to the “wipe date/factory reset” option. Once it’s highlighted press the Power key to select it.
Once you see the “Confirm wipe of all user data?” Press the Volume down key to highlight “Yes—delete all user data”, then press the Power key to select it.
4. Power the device off, then press and hold the Home key and press and release the Power key (while still holding the Home key).
From the Android Recovery screen, press the Search key.
Tap to select wipe data/factory reset then select Ok (located in the lower left of the screen). Note: if screen is not responsive use the Volume keys to scroll and the Camera key to select.
Select Yes – delete all user data, and then select OK (again lower left).
Select “reboot system now” and press OK.
5. This is becoming a common hard reset method and can be used to factory reset Samsung’s more recent Galaxy smartphones such as the Samsung Galaxy S III, the Samsung Galaxy S4, the S5, the Samsung Galaxy Note the Note II and Note 3, etc.

With the device powered off press and hold the Volume Up key the Home key and the Power key all at the same time.

When the phone vibrates (or you see the GALAXY Logo) release the Power key but continue to hold the Volume Up and Home key.

Continue holding the Volume up and Home key until the “Android system recovery” screen appears.

Use the Volume buttons to scroll to and highlight the “wipe data/factory reset” option, and then use the Power key to make the selection.

Once the factory reset is finished you may use the Volume and Power keys to highlight and select the “Reboot system now” option and the hard reset will be complete and your cell phone will be nice and squeaky clean.
6. Here is an alternate reset for a Motorola Atrix still running on the 2.2 Android OS…
While the phones power is off, press and hold the Volume down button and press and release the power button (note: if it doesn’t work after all the steps listed try holding down the power button along with the volume down button in this first step).
A "Fastboot" screen should pop up, press the Volume down key to cycle through the choices until you get to "Android Recovery", then press the Volume up key.
Wait for the "triangle!/Android". Once it pops up you’ll need to tap on the bottom right corner of the screen (note: it may take a few attempts). A menu should pop up.
Tap on "wipe data/factory reset", and then tap OK. Another confirmation screen will appear. Tap Yes and then OK.
After the data is cleared the "reboot system now" option should appear and is highlighted by Default. Tap OK.
Note: this type of reset is common on the 2.2 (Froyo) before the tech geeks wised up and removed the need to use the touch screen.
7. This reset is for the same phone, the Motorola Atrix, but one that’s running on the 2.3 OS.
Power off the phone, press and hold the Volume down button and Power button simultaneously while powering on the unit.
The "Fastboot" screen should pop up. When it does press the Volume down key to cycle through the choices until you get to "Android Recovery", and then press the Volume up key to boot in this mode.
Wait for the "triangle!/Android" screen to pop up. Once it does press both the Volume up and Volume down keys simultaneously. A Recovery Menu should pop up.
Tap on the Volume down key until "wipe data/factory reset" is highlighted, and then tap the Power button. Another Confirmation screen will come up. Tap on the Volume down key until it highlights “Yes” and then tap the Power button to make the selection.
After it’s done make sure "reboot system now" is highlighted and then tap the Power button.
In this method you don’t have to use the touch screen any more. So let’s say your touch screen isn’t responding therefore you can’t navigate the phone or go into your settings and do a regular factory data reset. Well now on the 2.3 there is hope. Just power off the phone and perform these steps and the reset should go through.
8. Here is a hard reset for a Sharp Android Smartphone.
While the device is off, hold the Sym button (it’s located on the keyboard) and the Power button simultaneously.
Once the Android boot screen appears highlight the Wipe data/factory reset option by using the volume buttons. Then use the Return key (on the keyboard) to actually make the selection.
Scroll down to Yes - delete all user data and then press the Power key to confirm.
Once it is done select reboot system now and press the Power key to confirm and reboot your handset.
Important Note: On some Sharp models (such as the Sharp FX Plus ADS1) if holding the Sym button and Power key simultaneously doesn’t take you directly to the Android system recovery screen you might have to do one additional step. If using this hard reset key combination takes you to a screen which shows an exclamation mark within a triangle, then press the Home key (while on that exclamation mark screen) and this should take you to your Sharps Android system recovery options.
9. Here is a common method used to hard reset an LG Android smartphone. So if you need to hard reset an LG Optimus this is the hard reset key combination to try first.
After the LG phone has been powered off, press and hold the Volume Down button. While holding the Volume Down button, press and hold the Home button. While holding both the Volume Down button and Home button, press and hold the Power button.
Continue holding these three keys down simultaneously until the LG logo appears.
Once the LG Logo appears release all of the keys. This will complete the reset on many LG phones; you will be given the option to “Select your language” and can proceed with setting up your device as if you were setting up the phone for the first time.
If however, you are taken to a fastboot screen or a screen with additional options then use the Volume Down key to scroll to and highlight the wipe data/factory reset option and then press the Menu key to make the selection.
The phone might give you a confirmation screen in which you can use the Volume Down key to scroll to and highlight Yes -- delete all user data and then press the Menu key to make the selection.
If you get an option to reboot system now then select that option with the Menu key. The phone will reboot, which can take a couple of minutes, and the hard reset will be complete.
10. A less common method to hard reset an Android smartphone, but the following key combination can be used to reset some cell phones including the Samsung Gio (GT-S5660).
Power the phone off, by using the power button or by removing and then reinserting the battery (when possible).
While the phone is off press and hold the Home button and the Power key at the same time (the Home key is typically the big button on the bottom center of the phone under the display/touch screen).
When the phone starts to power on and you see the phones logo you can release the power button but keep pressing the Home button until the Android system recover screen appears. Once it pops up you can release the Key(s).
Use the Volume keys to highlight the “wipe data/factory reset” option, and then use the Home key to make the selection. Scroll down using the Volume keys again until the “Yes—delete all user data” option is highlighted and then press the Home key to select that as well.
The system recover screen should pop back up and when it does make sure that “reboot system now” is highlighted and press the Home key to make the selection. The phone will restart and the hard reset will be done.
11. Another uncommon hard reset technique but similar to the one used in method #2. This process can be used to hard reset T-mobiles Prism and Prism II as well as AT&Ts Huawei Fusion (U8652).
Turn off the phone and then press and hold the Volume Up key and Power key simultaneously until the Android system recover screen appears.
Use the Volume Down key to highlight the “wipe data/factory reset” option and then use the Power button to make the selection.
Use the Volume Down key to highlight “Yes -- delete all user data” and use the power key to proceed with the reset.
Once the reset is complete the phone may return to the Android system recover screen. If it does then use the Volume Down button to highlight “reboot system now” and press the Power key to confirm the action.
The phone will restart and the hard reset will be complete.
Now you know how to hard reset an Android Smartphone and the next time your touch screen stops responding, your phone freezes, your phones power cycling, you forget your password, or pretty much any reason you wouldn’t be able to perform a reset through the settings, you’ll be set.
If I have forgotten any key combos that you know of, leave the method in the comments below so that I can add it to the list. Don’t forget to check out some of our many other popular posts and don’t forget to power your phone off every couple of days and watch what applications you choose to download onto your device that way you can keep your phone healthy and efficient. Hope you enjoyed the article, have a fantastic day, and enjoy your phone.

How to Reset your Nokia C2-03 Mobile Phone

How to Reset your Nokia C2-03 Mobile Phone


There are always two types of reset option with which phones come bundled, Soft Reset and Hard Reset.

1. Soft Reset .:

Soft Reset for C2-03 simply restores the .ini file from the ROM and it does not remove or uninstall any photos, videos or applications. You can Soft Reset your device by pressing some numeric keys all together or you can check the setting for the Reset Option. Combination Keys for Soft Resetting your device *#7780# so press this code in your phone and than hit the call button and than it will prompt you to soft reset your device.

2. Hard Reset .:

Hard Reset for C2-03 is also known as Total Reset and in this everything in your phone will be deleted and your phone will be restored to factory version, this is only recommended if you think your device is behaving abnormally, its slow and their some problem with camera or sound. Combination Keys for Hard Resetting your device *#7370# so press this code in your phone and than hit the call button and you will promoted to Hard Reset your device.

3. Warning .:

When resetting your device your device battery should be full or if you loose the device power when resetting your device may get crash and stop working so its really – 2 important.

செவ்வாய், 27 ஜனவரி, 2015

How to Disable Automatic App Updates on Android

How to Disable Automatic App Updates on Android

Having automatic app updates is a smart and convenient way to keep your device up-to-date with the latest and greatest. Not to mention there’s no need for user interaction. The only problem is not everyone wants their apps to be updated automatically, especially if you’re on a smaller mobile data plan. That and general updates can often change the entire experience of an app.
As a result, Google’s added an option to enable or disable the automatic app updates on the Google Play Store, as well as an option to only update if the user is on a WiFi connection to save their precious mobile data from a carrier like Verizon or AT&T. By default, auto updates are enabled. There’s a few different ways to disable them though, including customizing updates for individual apps, and we have the simple instructions for you below.
Screenshot_2013-10-08-12-02-59

Disabling Automatic App Updates

For starters you’re going to need to be inside the Google Play Store (formerly Android Market) to disable this feature. So head into your application tray and look for the white “Play Store” icon shown below. This is where we’ll start.
Screen Shot 2013-10-08 at 12.09.01 PM
Once you open the Google Play Store you’re going to head into the settings panel to make the necessary changes. This can be done by selecting the dedicated menu button on your Android device (or the 3 dots in the upper corner if you have on-screen keys) and then selecting Settings. From here you’ll want to select the third option down titled Auto-update apps, as shown in the image below for your viewing pleasure.
Screen Shot 2013-10-08 at 12.10.50 PM

Once you select the Auto-update apps from the menu shown above, you’ll be greeted with a pop-up of three different options. Those being Do Not Auto-update apps, Auto-update apps at any time. Data charges may apply, and Auto-update apps on WiFi only. This is where you’ll choose to completely stop auto-updates. Personally I have it set just to update when I’m on a WiFi network, as I’m usually home and get faster speeds from my home internet anyways.
Screenshot_2013-10-08-12-24-14
If you’re really picky about updates or even notifications pestering you (since I usually have a few a day) there’s conveniently an option to disable the notifications. I’d suggest you keep that checked though, as you never know when an important update might arrive for Gmail, or any other key apps on your device.
Then last but not least, you can control individual apps. If you’d like certain apps to still receive the auto-update feature but not every app, there is an option for that too. As an example to the right we’ve navigated to the Facebook app in the Play Store. Again hitting that same dedicated menu button (or 3 dots at the top) to open the settings list you’ll see an option and check box for Auto-update. This check box will enable that particular app to still update automatically. This comes in handy for things like Facebook, Gmail, or Google Search considering they’re all constantly getting improved by updates.
Once selected these apps will update on their own without any user interaction, but you’ll still get the updated notification to know what is going on with your device and applications.

Should You Use This Feature?

This is an option that completely depends on each users needs and situation. Being able to choose between when apps are automatically updated via data or WiFi is excellent. And taking that an extra step by allowing users to disable this for most apps, but not all, makes the options rather limitless for Android users.

How to Enable/Disable Auto Update Android apps

How to Enable/Disable Auto Update Android apps

you are tired of manually updating your application on your Android smartphone or tablet, you just need to do the following instructions

  1. Open Google Play Store
  2. Tap on Menu and go the Setting
  3. Check the “Auto-update apps “
  4. If you are worried about the data cost, check the “Update Over Wi-Fi only” too
  5. Find the apps you would like to be updated automatically
  6. Tap and check the “Allow automatic updating”
You can also Unmark the mentioned option to disable Auto update.

Update: Here is a step by step illustrated guide to manage whether to update applications automatically on Android or manually, and specify which applications should be updated automatically.
Enable-Disable-Auto-Update-Android-apps

How to turn off auto updates for apps and games on Android

How to turn off auto updates for apps and games on Android


How to turn off auto updates for apps and games on Android
Please note: this is a tutorial for inexperienced users (beginners).

Whether you have a ton of apps on your Android device, or just a small number, you might want to choose for yourself when to update them, instead of letting automatic updates do their job. Of course, disabling auto updates is an easy thing to do. But those who are new to Android may not immediately know where to begin. With the ever-growing number of Android activations, lots and lots of new users are embracing Google’s OS each day, so there are always rookies among us.

So, how do you turn off automatic updates? Well, you won’t be able to do it from your device’s settings, but via the pre-installed Google Play Store app. After you open the app, access the Play Store menu from the upper-left corner (this also works if you swipe to the right from the extreme left side of your screen). Your next stop is the Settings tab, where you’ll find an Auto-update apps option. Click it, and a pop-up window will be launched, letting you select three sub-options, with the first obviously being the one that needs to be checked: Do not auto-update apps; Auto-update apps at any time (data charges may apply); and Auto-update apps over Wi-Fi only. 

And that's it! You can always come back to change the way your apps are being updated.

P.S.: our short tutorial was made on stock Android 4.4.4 KitKat, but things should be roughly the same even if you have an older (or skinned) version of Android.

How to Turn Off Automatic App Updates in Android, iOS, Windows Phone 8.1, Windows 8.1

How to Turn Off Automatic App Updates in Android, iOS, Windows Phone 8.1, Windows 8.1

google_nexus_6_battery_notext.jpg
Many smartphone users download far too many apps for them to keep updating each one manually. Luckily, the major app platforms all have automatic app updates now, and the default setting for this is 'On'. This means that your apps will remain up to date with all the latest features and bug-fixes that the developers come up with, without you having to do a single thing.
And these days apps roll out bug fixes faster than you can say, "update", so keeping the app updates on automatic makes a lot of sense. But there are some major drawbacks involved as well, and these might cause you to rethink your automatic update policy.
For one thing, if automatic updates are enabled and not just limited to Wi-Fi, then you could end up inadvertently spending huge amounts of money as every small update is downloaded over your 3G connection.
Aside from that, constantly transferring data and updating the software also keeps the phone running, and keeps your battery running down a lot faster than you were expecting - turning automatic updates off could give you that little extra time you always find yourself needing.
And then, of course, there are the changes to software that you didn't want in the first place. Sometimes bugfixes add more bugs, and sometimes new features aren't improvements at all. There are times when you will discover that an app has updated and then find yourself wishing that the old version were still around.
For example, we're big fans of the iOS game Crossy Road - or were, until the latest update. We were playing it happily on an iPad 3 until it auto-updated. Since the update, the game started lagging on the iPad and became frustrating. Monetisation features in the game have also become more aggressive and get in the way of an otherwise great experience.
Such a thing can happen to any app and does give you a good reason not to update automatically. The adage "If it ain't broke, don't fix it" holds true. If you've faced any such situation and want to stop updating apps automatically, follow the steps in this guide.
Android
Android gives you a fair amount of freedom about updates. You can turn off all updates, or limit updates to Wi-Fi downloads only. You can also enable updates for only specific apps - so for example, you might want the latest versions of apps you use very frequently, but you don't want to waste bandwidth downloading updates for other apps that will be launched only once every three months.
To turn updates on or off, follow these steps:
  1. Open Google Play.
  2. Tap the hamburger icon (three horizontal lines) on the top-left.
  3. Tap Settings.
  4. Tap Auto-update apps.
  5. To disable automatic app updates, select Do not auto-update apps.
  6. If you want to instead auto-update apps only when you're connected to a WiFi network, tap Auto-update apps over Wi-Fi only in the same pop-up.
Android also lets you choose which apps you want to update automatically.
  1. To turn on auto-update for any app, go to the app page in the Google Play app.
  2. Tap the three vertical dots in the top right.
  3. Check Auto-update.
This way, you can disable automatic updates and still keep chosen apps ready with the latest versions.
android_auto_update.jpgiOS
On iOS, you can choose to either have automatic updates on or off, and if on, you can choose whether or not to use your mobile connection to download apps. There's no way to disable automatic app updates for individual apps on iOS - this means that either all apps will update, or none. If you want to stop all automatic updates, the steps are simple:
  1. Go to Settings > iTunes & App Store.
  2. To disable all automatic app updates, turn off the green switch next to Updates.
  3. If you want to automatically update apps, but only when you are connected to a Wi-Fi network, leave updates on and turn off Use Mobile Data instead.
Windows Phone 8.1
Like iOS, Windows Phone 8.1 also lets you choose whether or not to update all apps, or to update them only on Wi-Fi, and not on cellular data.
  1. Open Store.
  2. Tap the three horizontal dots icon on the bottom-right.
  3. Tap Settings.
  4. Tap the switch next to Update apps automatically to turn it off.
  5. You can instead turn on Only get updates over Wi-Fi to avoid unnecessary cellular data charges.
Windows 8.1
The settings for the Windows 8.1 app updates are very similar to Windows Phone 8.1. If you have a Windows 8.1 machine, you can follow these steps to disable automatic app updates.
  1. Open Store.
  2. Swipe from the right edge of the screen (or press the Windows Key + C) to reveal the Charms Bar.
  3. Tap Settings.
  4. Tap App Updates.
  5. Tap the button below Automatically update my apps to change it from Yes to No.

How to connect Android Mobile Phone to PC for internet

How to connect Android Mobile Phone to PC for internet

For Connect Android phone to PC OR Laptop, Perform 2 steps to follow.
1. Mobile Settings
2. Desktop computer OR laptop Settings

1. Mobile Settings

Before Start Configuration, Note that "Data" Option should be Enable in Android Phone. To Enable "Data", Go to settings -> Wireless & Networks -> Mobile Networks –> Data Enable, Check this box (Check Data Roaming in case of Roaming).
For Dual Sim Mobile Phones Select Sim1 OR Sim2 for Data Connection.

There are 2 Methods for connect Android Phones to PC OR Laptop for internet.

1.1 USB tethering
1.2 Portable Wi-Fi Hotspot

1.1 USB tethering
Plug in USB Cable from Your Desktop Computer/Laptop to Android Phone.
In Android phone go to settings -> Wireless & Networks ->Tethering & portable hotspot and tap it.
Now Check "USB Tethering".

Now You will be able to use the data connection from the phone on your PC/Laptop.

1.2 Portable Wi-Fi Hotspot
Configure Wi-Fi Hotspot in Android Phone. For That go to settings -> Wireless & Networks ->Tethering & portable hotspot -> Portable Wi-Fi hotspot settings -> Configure Wi-Fi hotspot.
Network SSID – priceandspecification
Security – WPA2 PSK
Password – 87654321 or you can set any 8 digit number.
Save it.

In Android phone go to settings -> Wireless & Networks ->Tethering & portable hotspot and tap it.
Check "Portable Wi-Fi hotspot"

Now You will be able to use the data connection from the phone on your (Wi-Fi enabled Devices) PC/Laptop.

2. Desktop computer OR laptop Settings.
2.1 how to connect Android Phone to PC for internet – Windows XP
2.2 how to connect Android Phone to PC for internet – Windows 7

2.1 how to connect Android Phone to PC for internet – Windows XP
Follow the steps 1.1 For connect Android Phone to PC for internet Via USB.
Follow the steps 1.2 For connect Android Phone to PC for internet Via Portable Wi-Fi Hotspot.

Click Here to Download Android Mobile Modem Driver / USB Tethering Drivers / RNDIS driver download for Windows XP.
It will Give you an error message “You can also try to download the original document by clicking here”. OR “The file exceeds the maximum size that we scan. Download anyway” You have to Click that link to download Zip File.

Password for connect_android.zip File : priceandspecification.in


connect_android.zip contains 4 Files.

File 1. Install Hot Fix Windows Xp(WindowsXP-KB959765-x86-ENU).
File 2. In case of Path not found for R NDIS in Windows Xp, Browse this folder for Modem driver installation.
File 3. Tethering file for windows Xp. Right Click on it and click on Install.
File 4. Select O.S. 32 bit or 64 bit, Browse path and install drivers

2.2 how to connect Android Phone to PC for internet – Windows 7
Follow the steps 1.1 For connect Android Phone to PC for internet Via USB.
Follow the steps 1.2 For connect Android Phone to PC for internet Via Portable Wi-Fi Hotspot.

In Windows 7 R NDIS driver are automatically installed on connect android mobile to PC via USB, In case of Driver not Installed Properly, Download connect_android.zip. And Use File 4.

Connect internet in PC Laptop by android mobile with USB

Connect internet in PC Laptop by android mobile with USB


Connect internet in PC Laptop by android mobile with USB. Today many android phone have a facility to share its data packet with personal computer (PC) or laptop by just enabling only one check box of your cell. Usually i need to connect internet in my laptop with this method when i cant access my broadband service. I have made this practical i.e Connect internet in PC Laptop by android mobile with USB, with Samsung galaxy mobiles and Sony Ericsson phone also with Micro-Max canvas mobiles, but it might be possible that your mobile is not having this facility. No need for any PC suite for connecting to access internet and not even require an user-id and password. This is all possible by “tethering” feature means actually we can share the Internet connection of mobile phone with other devices using cable. You can even access internet on PC by mobiles using WI-FI tethering and Bluetooth tethering feature. Even you can share your internet data of mobile with another mobile. Here are steps to connect internet in PC laptop by android mobile with USB:

Connect internet in PC Laptop by android mobile with USB

Step 1.) First step is to Connect your mobile with PC or Laptop via USB cable.
Step 2.) Check whether your data packet is Enable or not and ensure that your internet is properly working in mobile and you are able to open web pages in your android mobile any browser.
Step 3.) After performing above steps, go to mobile setting and select wireless and networks and go to “Tethering and portable hotspot”. i.e Setting -> Wireless and networks ->Tethering and portable hotspot. Now select “USB Tethering” and make it enable as shown below.
Connect internet in PC Laptop by android mobile with USB
USB tethering on : Connect internet in PC Laptop by android mobile with USB
Step 4.)Check for the “internet Network” to appear in your PC in bottom most right position as shown below, and click that icon to check the notification that if you can make internet access.
Connect internet in PC Laptop by android mobile with USB
Internet network working

புதன், 21 ஜனவரி, 2015

Steps to Connect Internet from PC to Android Mobile

How to Connect PC Internet to Android Mobile Phone Via USB Cable Without Rooting


People used to share computers and laptop internet data on their phones. Now, this concept is a bit less popular among the people. A question that often arises in their mind is “How to connect PC’s internet with Android phone?” So, below are some elementary steps one needs to follow to get it done.

Connect PC Internet to Android Mobile

How-To-Connect-PC-Internet-to-Android-Mobile-Phone-Via-USB-Cable-Without-Rooting

Steps to Connect Internet from PC to Android Mobile

Prerequisite
– USB cable
– Computer or laptop with internet connection
Step: 1
Firstly, all you need to do is connect pc / laptop  with your phone via the USB cable.
Step: 2
Once your Android phone is connect  pc, go to settings. Under the head wireless and networks tap on more which will then be followed by a page containing few options.
Step: 3
After tapping on more, you will see the following options.
– Airplane mode
– VPN
– Tethering and portable hotspot
– Mobile networks
– USB internet
Click on the adjoining box alongside the USB internet option.
Step: 4
Next, the select PC system version dialogue box will appear. From the drop down list, stipulate the operating system which your PC possesses.
Step: 5
After you particularize your operating system, click on the next button and follow the instructions carefully.
Step: 6
In the absence of instructions, go to network connections on your computer and right click over the network that you wish to share and go to properties.
Under the head sharing, clicks on “allow other network users to connect through this computer’s internet connection” and then click on done.

செவ்வாய், 20 ஜனவரி, 2015

How to connect mobile internet to pc

How to connect mobile internet to pc

First connect your Samsung Galaxy Phone to your PC and after that do not select "File Transfer Mode".

Step 2

On Your Phone, Go to Menu > Setting > Wireless and network > Mobile network and Check "Use Packet Data"

Step 3

Now, Go to Menu > Setting > Wireless and Network > Tethering and portable Hotspot and Check "USB Tethering"

Step 4

Install Samsung KIES on your system, which is an official PC suite for Samsung Smartphone and can be downloaded from Samsung Site
Step 5

Next, on your computer, Go to Control Panel > Network and Internet Connections > Network Connections and now you will see Samsung Modem there.

Step 6

Now finally, you can connect the Internet and start browsing using your Samsung galaxy Smartphone as modem and use the internet endlessly. Make sure you have enough data available on your smart phone to make it available for your computer internet.

in my mobile i can connect the internet but when i try to connect in my PC then i can't so what i did

1. Connect my mobile to PC through USB Cable

2. Go to Settings

3. Wireless and networks

4. Select the Option Tethering and Portable Hots

5. Enable the USB tethering

Now your Mobile Internet is connect through PC

Happy Enjoy using net connection in System


This is the way to connect to Internet in PC by USB data cable:

Step 1: Settings> Wireless and Network settings> Tethering and portable hotspot> then Tick USB Tethering.

Step 2: Settings> Wireless and Network settings> Mobile Networks> then Tick Use Packet Data.

செவ்வாய், 30 டிசம்பர், 2014

How to download Android games APK & OBB files from PC

How to download Android games APK & OBB files from PC


If you want to download games APK & OBB files ( aka APK Expansion Files ) from PC, follow these steps:
  1. Install APK Downloader on your Chrome / Firefox browser. Make sure your configuration is correct.
  2. Open Google Play Store, find the game you want to download. Press “Download APK” to start downloading game files.
  3. Copy those files into your phone’s SD card.
    • For APK file: install it. But don’t run the game yet.
    • For OBB files: Copy these file into /SDCARD/Android/obb/<package-name>/ , with <package-name> is the package name of your game.
  4. Run the game.