திங்கள், 20 ஜூலை, 2015

How to create a bootable Windows 7 USB flash drive

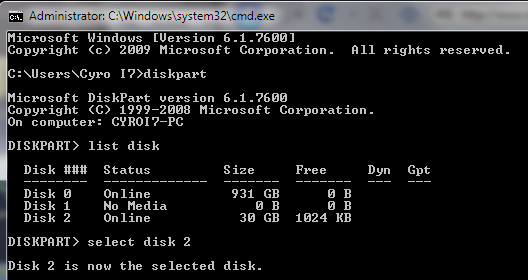
How to create a bootable Windows 7 USB flash drive :  For those who don’t have a windows 7 installation disk or either it is damaged, then you can create and use a Bootable USB flash drive to install Windows 7 on your PC. The process of creating a Bootable windows 7 USB flash drive is fairly easy, however you will have to download a copy of windows 7 ISO file.
Fortunately Microsoft provides Windows 7 ISO images as free downloads to the public.  You can download Windows 7 iso images from here and Once you have downloaded a Windows 7 ISo file, you can then follow the instructions provided below to create a Bootable windows 7 USB flash drive.

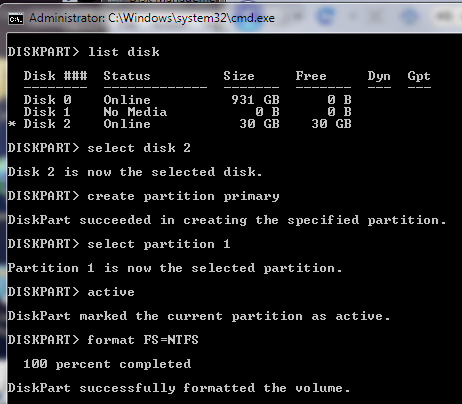
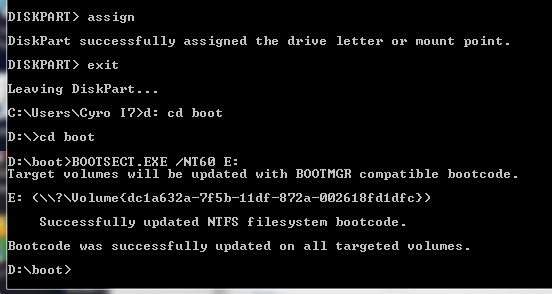
Instructions to create a Bootable Windows 7 USB Flash Drive 

bootable usb flash drive.
  • Step 1: Download rufus on your computer and run it .
  • Step 2: Plug in your USB flash drive into your computer .
  • Step 3: From Rufu’s settings, Choose NTFS as the file system.
  • Step 4: Check ” Quick format ” and ” Create extended label and icon files
  • Step 5: Check ” Create a bootable disk using ” and click the drive icon beside it to select the windows 7 ISO file .
  • Step 6: Now click on start to create a bootable window 7 USB flash drive .
After a few minutes your Windows 7 bootable  USB flash drive will be  ready for installation. Reboot your PC and set the bootable flash drive as a first boot priority in the bios settings. Save the bios settings and reboot once again to continue with the windows 7 installation process .
 Note: You have to allow booting from USB devices in your BIOS settings in order to proceed further with the windows 7 installation .

Install Windows 7 from a USB drive the very easy way

Install Windows 7 from a USB drive the very easy way

The fastest way to install windows 7 is from a bootable usb drive. You can cut the install time down to around 15 minutes compared with 30-40 via DVD if you use a fast drive.
People still asking me to explain what is the best way to do this as many of the guides online are too complex, or require third party software which doesn’t always work as they supposed to.
With this BootableUSB guide all you need to ensure is that your motherboard supports USB booting, and this is a common feature now for most of the computers.
Today I am going to publish a step by step guide which works perfectly and doesn’t require any additional tools – I have been doing it for some time now to create bootable Windows install drives.
You need to get hold of a fast USB 2.0 flash drive. It doesn’t need to be 32GB or bigger,however, all you need is a 4GB unit. The faster it is, the better.
What you need:
– Windows 7 DVD install disc or ISO image
USB Drive (4GB+ and as fast as you can get)
– Running Windows Operating system
– Working set of hands and eyes
– A few minutes of your life
Plug in your USB drive in the USB port:
Usb Drive Plugged
Before going any further, make sure you have removed any important files on your drive to a safe location, what we are about to do next is to erase the entire contents of the drive.
Insert your DVD of Windows 7 into the computer, but don’t start the normal install process.
Open your ‘My Computer’ and make a note of the drive numbers of both the USB drive and the DVD drive with Windows 7 files on it.
Usb And Computer Drives

As you can see from the image above, the DVD drive is drive has letter D assigned and the USB drive is E.
Open the command prompt with admin rights. Type cmd in Start menu search box and hit Shift+Ctrl+Enter.
To keep things really easy, if you see text in upper case, it means this is what you type into the command prompt (you don’t need to type in upper case).
cmd-prompt-usb-bootable

Next type
DISKPART
this loads the diskpart application we need to proceed
Then type
LIST DISK
the image above shows our 32 GB USB drive is listed as DISK 2
so you have to type
SELECT DISK 2 (your USB Drive may have a different number, don’t follow exactly this text it depends on your usb drive)

You will get a successful response “Disk 2 is now the selected disk”
Clean Cmd USB Drive
Next we want to clean the USB drive
Type:
CLEAN
you will get a successful response ‘DiskPart succeeded in cleaning the disk”.
Clean USB Drive

After the drive is cleaned follow the list in the image above (detailed below in list order) – you can also note the successful text responses from the OS as you enter each command.
SELECT DISK 2 (or what number your USB drive has)
CREATE PARTITION PRIMARY
SELECT PARTITION 1
ACTIVE
FORMAT FS=NTFS
Formatting can take a little time depending on the size of the drive, our 32GB unit took about 10 minutes to format - you will see a percentage readout until it is finished.
Bootable USB Final Cmd Prompt
Next type:
ASSIGN
EXIT (DISK PART will exit)

Type D: CD BOOT (substitute the “D” if necessary with the letter of your Windows 7 DVD drive)
then key
CD BOOT
then
BOOTSECT.EXE /NT60 E: (substitute the “E” if necessary with the letter of your now ready USB drive) – we are telling the system to create a boot sector file on the USB drive.
Now you can exit the command prompt and copy all the files on the Windows 7 DVD to the USB drive.
Once this step is finished you’ll be ready to boot from this drive, all you need to do is configure your motherboard bios setup to boot first from USB rather than hard drive or optical drive. If you don’t know how to do this, refer to your specific motherboard manual or search the internet.
Now, Windows 7 installation should take between 40% and 60% of the time it does from the DVD disc.
Last step: Drink a cup of tea, from now on you can do this again and again :)