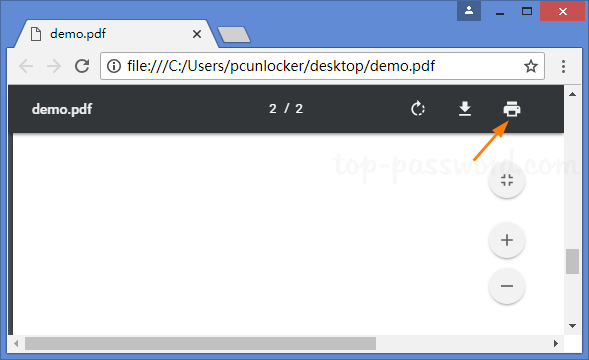
புதன், 28 ஏப்ரல், 2021

dropdown box (Menu) create using CSS


Basic Dropdown

Create a dropdown box that appears when the user moves the mouse over an element.

Example

<style>
.dropdown {
  position: relative;
  display: inline-block;
}

.dropdown-content {
  display: none;
  position: absolute;
  background-color: #f9f9f9;
  min-width: 160px;
  box-shadow: 0px 8px 16px 0px rgba(0,0,0,0.2);
  padding: 12px 16px;
  z-index: 1;
}

.dropdown:hover .dropdown-content {
  display: block;
}
</style>

<div class="dropdown">
  <span>Mouse over me</span>
  <div class="dropdown-content">
    <p>Hello World!</p>
  </div>
</div>
Try it Yourself »

Example Explained

HTML) Use any element to open the dropdown content, e.g. a <span>, or a <button> element.

Use a container element (like <div>) to create the dropdown content and add whatever you want inside of it.

Wrap a <div> element around the elements to position the dropdown content correctly with CSS.

CSS) The .dropdown class uses position:relative, which is needed when we want the dropdown content to be placed right below the dropdown button (using position:absolute).

The .dropdown-content class holds the actual dropdown content. It is hidden by default, and will be displayed on hover (see below). Note the min-width is set to 160px. Feel free to change this. Tip: If you want the width of the dropdown content to be as wide as the dropdown button, set the width to 100% (and overflow:auto to enable scroll on small screens).

Instead of using a border, we have used the CSS box-shadow property to make the dropdown menu look like a "card".

The :hover selector is used to show the dropdown menu when the user moves the mouse over the dropdown button.


Dropdown Menu

Create a dropdown menu that allows the user to choose an option from a list:

This example is similar to the previous one, except that we add links inside the dropdown box and style them to fit a styled dropdown button:

Example

<style>
/* Style The Dropdown Button */
.dropbtn {
  background-color: #4CAF50;
  color: white;
  padding: 16px;
  font-size: 16px;
  border: none;
  cursor: pointer;
}

/* The container <div> - needed to position the dropdown content */
.dropdown {
  position: relative;
  display: inline-block;
}

/* Dropdown Content (Hidden by Default) */
.dropdown-content {
  display: none;
  position: absolute;
  background-color: #f9f9f9;
  min-width: 160px;
  box-shadow: 0px 8px 16px 0px rgba(0,0,0,0.2);
  z-index: 1;
}

/* Links inside the dropdown */
.dropdown-content a {
  color: black;
  padding: 12px 16px;
  text-decoration: none;
  display: block;
}

/* Change color of dropdown links on hover */
.dropdown-content a:hover {background-color: #f1f1f1}

/* Show the dropdown menu on hover */
.dropdown:hover .dropdown-content {
  display: block;
}

/* Change the background color of the dropdown button when the dropdown content is shown */
.dropdown:hover .dropbtn {
  background-color: #3e8e41;
}
</style>

<div class="dropdown">
  <button class="dropbtn">Dropdown</button>
  <div class="dropdown-content">
    <a href="#">Link 1</a>
    <a href="#">Link 2</a>
    <a href="#">Link 3</a>
  </div>
</div>
Try it Yourself »

Right-aligned Dropdown Content

If you want the dropdown menu to go from right to left, instead of left to right, add right: 0;

Example

.dropdown-content {
  right: 0;
}
Try it Yourself »

More Examples

Dropdown Image

How to add an image and other content inside the dropdown box.

Hover over the image:


Try it Yourself »

Dropdown Navbar

How to add a dropdown menu inside a navigation bar.

திங்கள், 12 ஏப்ரல், 2021

3 Ways to Unlock or Remove PDF Permissions Password with Ease


3 Ways to Unlock or Remove PDF Permissions Password with Ease

Unable to edit a PDF document with read-only restriction? How do I remove printing restriction from a PDF file? When you forgot the permissions password (also known as owner password) of a secured PDF file, you'll be unable to edit, copy or print its contents. In this tutorial we'll show you 3 simple ways to unlock or remove PDF permissions password (owner password) with ease.

Method 1: Unlock or Remove PDF Permissions Password with Acrobat Pro

The official way to remove PDF password is to use the Adobe Acrobat Pro tool. If you can remember the original permissions password, you can unlock and remove all types of security restrictions on your PDF document in several simple steps.

  1. Open your secured PDF document with Acrobat Pro. Click the File menu and then select Properties.

  2. When the Document Properties dialog box appears, go to the Security tab. The document restrictions summary shows which operations are not allowed. To remove all those restrictions, you have to choose "No Security" from the "Security Method" drop-down list.

  3. A window should appear saying your PDF document is protected. Enter your current PDF permissions password and click OK.

  4. Click OK to confirm that you want to remove security from this document.

  5. Save your changes, the permissions password will be removed from the original PDF file.

Method 2: Unlock or Remove PDF Permissions Password with Chrome

You will be quite surprised to know that Chrome has a built-in PDF reader / writer feature which could be utilized to unlock and remove PDF permissions password. Let's see how:

  1. Open the Google Chrome browser, drag and drop your protected PDF document into the existing or a new tab. The browser will prompt you to enter the permissions password. Enter the password and click OK to open file.
  2. Click the Print icon on the PDF viewer toolbar or press the Ctrl + P keyboard combination.

  3. Under the Destination section, click the Change button to select "Save as PDF". Next, click on the Save button.

  4. From the ”Save As” dialog box, select the path (such as the Desktop) where to store the new PDF, enter the file name, and then click on Save.
  5. Now, open the new PDF document and it won't be password protected so that you can easily edit, print, and making changes to it.

Method 3: Remove PDF Permissions Password with Third-Party Software

The above methods only work if you can remember the PDF permissions password. If you've completely forgotten it, you have to make use of third-party software to remove the security restrictions. Password Recovery Bundle is all-in-one password cracking utility that lets you recover the document open password, as well as removing permissions password of your PDF file.

  1. Launch the Password Recovery Bundle software. Click the "Recover From File" button located at the right side and select the "PDF Password" option.

  2. Select the password-protected PDF file from the dialog box and hit Open.

  3. Next, choose the "Remove Owner Password" radio button and click Next.

  4. The program will create a duplicate copy of the original PDF document, and that duplicate copy is unlocked and all the editing/copying/printing restrictions has been removed.

  5. When you open the duplicate PDF document with Adobe Acrobat Reader or your browser, it would no longer be asking you a permissions password.

After successfully unlocking and removing your PDF permissions password, you're free to copy content or extract images from the unprotected PDF file and also edit/print without any restriction.

சனி, 3 ஏப்ரல், 2021

How To Record TeamViewer Session


How To Record TeamViewer Session

TeamViewer, the much loved software for screen-sharing and remote desktop control supports recording sessions. Record session is one of the new features available in TeamViewer (introduced with version 7.0) which lets you record a live session with a simple mouse click.

The Record Session feature not only enables you record a session but also lets you convert the recorded video file to the popular AVI format. By default, TeamViewer saves the recordings in .tvs format. Another advantage of this feature is that the recoded session can be played within TeamViewer software without the help of any third-party media players.

Steps to record TeamViewer session

Step 1: Launch TeamViewer and get access to a remote machine.

Step 2: When the session is in progress, click Extras > Record > Start button to begin recording the session. Once done, click Stop button (go to Extras > Record > Stop) to end the recording and save the file in a desired location. As we mentioned earlier, TeamViewer saves the video file in .tvs format.

Record Session In TeamViewer Picture2 Record Session In TeamViewer

To convert the video file from .tvs to .avi format follow the next two steps:

Step 1: Run TeamViewer software. In the main screen, click Extras > Play or convert recorded session option to browse to the location of the recorded file. Select the video file and click Open button.

Record Session In TeamViewer Picture4

Step 2: Once the video file starts playing in TeamViewer, click Convert button to see options to select the target file location. Here, you will also see options to select the codec type and resolution for the AVI video file. If you are not sure which codec and resolution to choose, go ahead with default settings.

Record Session In TeamViewer Picture5

Record Session In TeamViewer Picture6

Once done, click Convert button to start converting the selected video file from .tvs to .avi format. Depending on the duration of the session, selected codec and resolution the conversion process may take a few minutes to hours.

Record Session In TeamViewer Picture43JPG

The .avi file then can be played in any of the popular media player software.

To automatically record all sessions:

An option is also available to automatically record all your sessions. To enable this feature:

a. Open TeamViewer main screen.

b. Navigate to ExtrasOptions  and then Remote Control.

c. Enable Auto record remote control sessions option.

Record Session In TeamViewer Picture7

வெள்ளி, 26 மார்ச், 2021

Create a Fixed Sidebar

 <!DOCTYPE html>

<html>

<head>

<meta name="viewport" content="width=device-width, initial-scale=1">

<style>

body {

  font-family: "Lato", sans-serif;

}


.sidenav {

  width: 130px;

  position: fixed;

  z-index: 1;

  top: 20px;

  left: 10px;

  background: #eee;

  overflow-x: hidden;

  padding: 8px 0;

}


.sidenav a {

  padding: 6px 8px 6px 16px;

  text-decoration: none;

  font-size: 25px;

  color: #2196F3;

  display: block;

}


.sidenav a:hover {

  color: #064579;

}


.main {

  margin-left: 140px; /* Same width as the sidebar + left position in px */

  font-size: 28px; /* Increased text to enable scrolling */

  padding: 0px 10px;

}


@media screen and (max-height: 450px) {

  .sidenav {padding-top: 15px;}

  .sidenav a {font-size: 18px;}

}

</style>

</head>

<body>


<div class="sidenav">

  <a href="#about">About</a>

  <a href="#services">Services</a>

  <a href="#clients">Clients</a>

  <a href="#contact">Contact</a>

</div>


<div class="main">

  <h2>Auto Sidebar</h2>

  <p>This sidebar is as tall as its content (the links), and is always shown.</p>

  <p>Scroll down the page to see the result.</p>

  <p>Some text to enable scrolling.. Lorem ipsum dolor sit amet, illum definitiones no quo, maluisset concludaturque et eum, altera fabulas ut quo. Atqui causae gloriatur ius te, id agam omnis evertitur eum. Affert laboramus repudiandae nec et. Inciderint efficiantur his ad. Eum no molestiae voluptatibus.</p>

  <p>Some text to enable scrolling.. Lorem ipsum dolor sit amet, illum definitiones no quo, maluisset concludaturque et eum, altera fabulas ut quo. Atqui causae gloriatur ius te, id agam omnis evertitur eum. Affert laboramus repudiandae nec et. Inciderint efficiantur his ad. Eum no molestiae voluptatibus.</p>

  <p>Some text to enable scrolling.. Lorem ipsum dolor sit amet, illum definitiones no quo, maluisset concludaturque et eum, altera fabulas ut quo. Atqui causae gloriatur ius te, id agam omnis evertitur eum. Affert laboramus repudiandae nec et. Inciderint efficiantur his ad. Eum no molestiae voluptatibus.</p>

  <p>Some text to enable scrolling.. Lorem ipsum dolor sit amet, illum definitiones no quo, maluisset concludaturque et eum, altera fabulas ut quo. Atqui causae gloriatur ius te, id agam omnis evertitur eum. Affert laboramus repudiandae nec et. Inciderint efficiantur his ad. Eum no molestiae voluptatibus.</p>

</div>  


</body>

</html> 


Auto Sidebar

This sidebar is as tall as its content (the links), and is always shown.

Scroll down the page to see the result.

Some text to enable scrolling.. Lorem ipsum dolor sit amet, illum definitiones no quo, maluisset concludaturque et eum, altera fabulas ut quo. Atqui causae gloriatur ius te, id agam omnis evertitur eum. Affert laboramus repudiandae nec et. Inciderint efficiantur his ad. Eum no molestiae voluptatibus.

Some text to enable scrolling.. Lorem ipsum dolor sit amet, illum definitiones no quo, maluisset concludaturque et eum, altera fabulas ut quo. Atqui causae gloriatur ius te, id agam omnis evertitur eum. Affert laboramus repudiandae nec et. Inciderint efficiantur his ad. Eum no molestiae voluptatibus.

Some text to enable scrolling.. Lorem ipsum dolor sit amet, illum definitiones no quo, maluisset concludaturque et eum, altera fabulas ut quo. Atqui causae gloriatur ius te, id agam omnis evertitur eum. Affert laboramus repudiandae nec et. Inciderint efficiantur his ad. Eum no molestiae voluptatibus.

Some text to enable scrolling.. Lorem ipsum dolor sit amet, illum definitiones no quo, maluisset concludaturque et eum, altera fabulas ut quo. Atqui causae gloriatur ius te, id agam omnis evertitur eum. Affert laboramus repudiandae nec et. Inciderint efficiantur his ad. Eum no molestiae voluptatibus.